Site News
Articles My318iS Links Contact Me
My Modifications
My Modifications
H&R Sportline Springs & Bilstein Sport Gas Shocks
H&R Sportline Springs & Bilstein Sport Gas Shocks [SOLD!]
This kit was purchased from Turner Motorsport for about $580. Of all of the suspension upgrades performed, this was the most worthwhile, though one of the more expensive. This upgrade yielded the largest improvement in handling and was worth every dollar. Installation can be tricky and requires spring compressors. The ride is a little rough but not to the point of annoyance or discomfort. Eibach springs are an alternative: they offer slightly improved ride comfort while sacrificing some stiffness. The ride on the H&R's seems perfectly fine, and after the springs settled the car saw a 1.75" drop, which was a great cosmetic improvement as well.
These were definitely installed on my second car. After smacking my oil pan on a rock on a back road, and a renewed interest in road-tripping, I decided to ditch the lowered suspension. I traded these for some new Boge TurboGas shocks and used my old stock springs. It was fun while it lasted, but not practical for anything other than driving on well-paved roads.
Suspension Techniques Anti-Sway Bars
These were well worth the money. For about $280 at Turner Motorsport, I was able to eliminate about 40% of my bodyroll. They feature a 22mm front bar and an adjustable 19mm rear bar, as well as polyurethane bushings and reinforcing plates for the rear mounting points. There was a marked difference in cornering: the car felt to be "riding on rails" so to speak. These were installed prior to my springs & shocks, so I can say with great certainty that they were a sound investment on their own. Installation was...interesting.
The only thing that Suspension Techniques really gets dinged for by many people that buy their kit is their mounting hardware, mainly in the front. It requires some tinkering, but nothing is missing. Using the rear reinforcements requires welding as well: I am fortunate & own a MIG welder so I was able to install the tabs. Overall, I would highly recommend this upgrade. Be sure to keep the rear bar set somewhat loose to avoid understeer with this kit. Again, these were put on my econd vehicle.
Racing Dynamics Strut Tower Braces
Racing Dynamics Strut Tower Braces [SOLD!]
I purchased both a front and rear strut tower brace from Turner Motorsport. These Racing Dynamics-made braces are aluminum and weigh very little, probably in the neighborhood of 5lbs total counting both of them. There are steel Sparco models (front) out there that will obviously be heavier, and some would argue stiffer because they are steel, though I doubt that a difference would be noticed. I paid about $400 for both, while the Sparco front unit is $90. In the end, the Sparco unit is probably a better value, and I likely would have purchased it had I known about it back when I did this upgrade. Again, the difference in stiffness is probably not something that one would really notice while driving, making the Sparco unit a viable candidate unless you are extremely concerned about adding weight.
Installation was very simple. To get the front in, I had to jack the front wheels off the floor to un-flex the body. The rear one required me to pull out the side caprpeting and cut holes in it. All-in-all, it took about 2 hours. The rear brace was mostly useless since the rear towers flex up & down rather than in & out. An effective rear brace would bolt to the floor. Overall, the front brace was worth it: I noticed a difference backing out of my driveway. The rear brace probably does nothing other than look nice.
The front bar was destroyed in the crash (but it DID save the engine). The rear bar has been installed, prettymuch just because I already let the moeny go, the it is not hurting anythign being in there. Eventually I will shell-out for another front bar.
Polyurethane Control Arm Bushings [Removed]
When the time came to replace the rubber front control arm bushings, I opted to use some solid polyurethane ones. They cost about $100 from Turner Motorsport. I did not really notice much of a difference in handling aside from a slightly stiffer front end, but since the parts needed replacing anyway that does not bother me terribly. They are on the second car. These units wore out after about 5 years of use, and have been replaced with 1996+ M3 stock mounts. Aside from being much less expensive, the M3 mounts have almost twice as much rubber as the E30 stockers, and they give a smoother ride. The part number for these is 31-12-9-069-035. They are CENTERED, not offset.
Polyurethane Rear Subframe Mounts [Removed]
The original rubber rear subframe mounts tore a couple years back, and at the recommendation of a few fellow enthusiasts, I upgraded to some solid polyurethane ones from Bavarian Autosport for about $120. Installation was easily one of the most difficult jobs I have faced yet (the removal of the old ones actually, installation of the new ones was relatively simple in comparison). All said & done, this seemed to be one of the best upgrades I had done yet, although it turns out that I was mistaken.
I have since reverted to stock mounts. Using a lathe & some pipe fittings, I made some custom tools to press them in. This was well worth all of the effort. The poly bushings transmitted horrendous amounts of noise and vibration into the cabin. Stock rubber mounts have made the ride far more comfortable, and the handling has not suffered at all. It turns out that installing poly bushings felt like an upgrade because the stock mounts were totally shot. Of course I thought it was amazing! However, stock mounts are very very capable, and much more comfortable than poly ones.
Polyurethane Rear Trailing Arm Bushings
Polyurethane Rear Trailing Arm Bushings [Removed]
The trailing arm bushings were replaced about a year after the subframe mounts as they were one of the few rear suspension components that still needed to be replaced. The job was somewhat difficult, but I was able to do it without disconnecting the CV shafts or dropping the rear subframe. They were $60 from Bimmerworld, and were worth the money. They helped to stiffen up the feel of the rear suspension, and eliminate an annoying clunking that was due to the worn out rubber bushings allowing things to move around a little too much. Once again, this is an item that went right on my new car. Be sure to use lots of silicone grease to reduce squeaking! HOWEVER!!! I have gone back to stock, and it turns out that stockers handle just as well, while being much quieter. Once again, going from worn stock bushings to ANYTHING new feels amazing. Poly mounts are no better than stock unless a dedicated track car is being built.
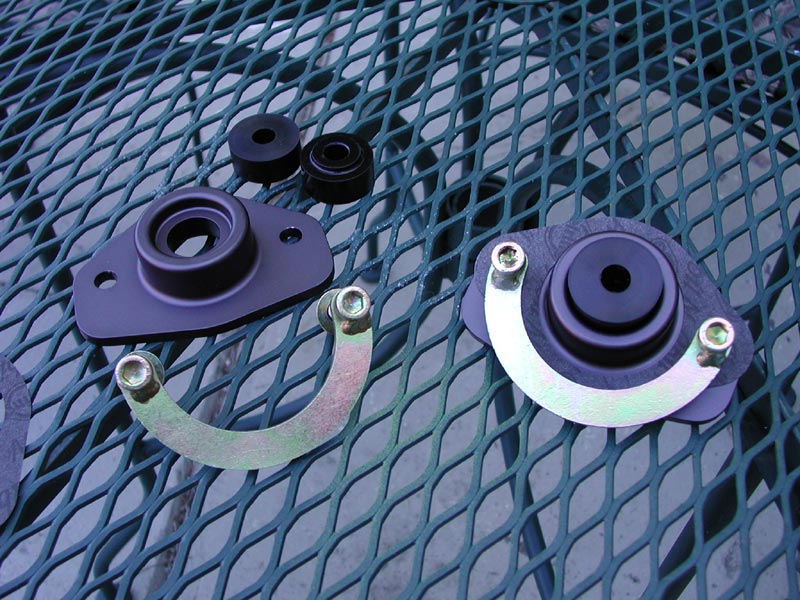
Ground Control Rear Shock Mounts
About a year after I installed the Bilstein's & H&R's the original rubber rear shock mounts started to go: this was indicated by a clunking noise occurring when going over large bumps. I opted to use the Ground Control units that Bimmerworld sells for $90. They are solid aluminum with polyurethane inserts that can be replaced for about $10 when they wear out. They made the rear end feel slightly stiffer and since the original units needed replacing anyway, were a very good upgrade, and being so are on my second car.
Camber Corrective Front Shock Mounts
Camber Corrective Front Shock Mounts [Removed]
These mounts were purchased from Bavarian Autosport for about $80 each. They were installed more for tire wear reasons than to improve handling, and add 1/2 degree of positive camber. The negative camber in the front was causing too much wear on the inside of my tires, so I decided to remedy the problem with these. There are adjustable camber kits available for $300+, but are only necessary if you are a serious track enthusiast. The units I purchased are only worth it if you are concerned about tire wear really. They have also been removed as I sold the sport springs & dampers.
The new car's front mounts were worn out when I got it, so I put a pair of these on there.
Zimmerman Crossdrilled Rotors & Axxis Ultimate Brake Pads
Previously, I had been using ATE Powerdisc slotted rotors and some Pagid street pads. They worked decently, but I would not buy them again. The ATE's warped slightly, and the Pagid pads were VERY dusty and got to be quite squeaky. The new setup is far better. The Zimmerman cross-drilled rotors have yet to warp (it has been about 18 months since the install), and the Axxis Ultimate pads are relatively dust-free in comparison to the Pagid's and rarely squeal. The performance is phenomenal: cold-bite is great and only gets better as they warm up. When they are "up to temperature," they are amazing. I have managed to activate the ABS at freeway speeds in dry conditions with some relatively sticky tires (Falken Azenis Sport's). I was able to get a deal on the parts (pads, rotors and new wear sensors): I paid $300 shipped from a parts dealer on Bimmerforums. These units are being used on the new vehicle.
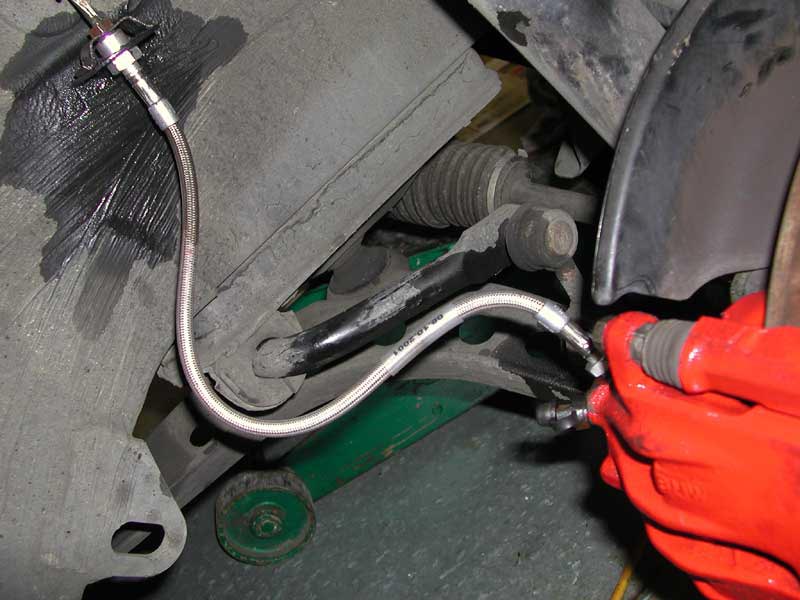
Stainless Steel & Teflon Coated Brake Lines
For about $110 I was able to make the feel of my brake pedal go from that of a sponge to that of a rock. They were purchased from Bavarian Autosport (on sale) and were definitely worth the money. Be sure to bleed your brake system VERY well once you have installed these. Installing the two that go between the subframe & rear trailing arms is a real "adventure" as well. On the new car? Yes, definitely.
E28 535i Brake Master Cylinder
E28 535i Brake Master Cylinder [Previous Vehicle]
The stock E30 318IS brake master cylinder has a 22.2mm diameter front cylinder and a 17.5mm rear cylinder. The 535i brake master cylinder has 23.8mm front and rear cylinders. This direct bolt-on cost about $10 at a wrecking yard, and made the brake pedal noticeably stiffer. There is a popular upgrade where the master cylinder is upgraded to a 25mm unit from a 7 series model, but it costs about $100, and I felt that the "wrecking yard special" was a better deal. Overall, I would say this could be the $10 I have spent on brakes, but you will need a $50 brake-bias adjuster. Buying a used MC is also a bad idea, for reference. I was lucky and it worked fine.
I have NOT installed this on the new car. Unless you are going to purchase a brake-bias adjuster, do not install a MC with equal diameter front & rear pistons. It will upset the braking balance, and your rear wheels will lock up more frequently than you may like!
Solid Brake Caliper Carrier Bushings
Solid Brake Caliper Carrier Bushings [Removed]
I installed these with my Zimmerman rotors & Axxis pads. They are supposed to promote more even pad wear & better braking by keeping the caliper aligned perfectly with the rotor. Thus far, pad wear seems about the same as before, and I cannot say whether or not braking has improved as a result of the bushings since I changed the pads & rotors at the same time. These bushings are $60 per end of the car, costing $120 total. They ONLY work with ATE calipers. In my case, they worked fine & the rears, but the front calipers are Girling units and do not use the same carrier setup. Perhaps I will be able to locate some ATE units at a wrecker at some point. These were put on the new car during the brake-upgrading process.
Mild Weight Reduction
Mild Weight Reduction [Previous Vehicle]
On the second car, I have removed the AC system (I never used it anyway, and it was in the way of the engine work i needed to do). The wahser resivoir left as well, but mainly due to it being in poor condition from the prevuious owner. My first car had a gutted trunk, and the rear interior was removed during autoX. The current 318iS still has all of the interior bits since it is my daily driver/commuter, and it did not make much of a difference at autoX anyway.
Corbeau A4 Seats & 4pt. Harnesses
Corbeau A4 Seats & 4pt. Harnesses [Removed]
The Corbeau A4 seat is a good investment in my opinion. It best fits those with a size 30-32 waist. With these seats installed, I could pay more attention to the road/course since I no longer need to try to stay in my seat. The four-point harnesses do that for me. The seats, harnesses & brackets cost me about $1000.
The seats were damaged in the crash, so I did not install them in the new car. Four-point harnesses are unsafe without a roll cage and harness bar anyway.